

So, I survived as a first-time webinar speaker earlier this month! I’d been an attendee on many in recent years, but this was my first time as presenter and I was a bit nervous about coming across polished and full of useful information. It helped, though, that the topic was something I’ve been engrossed in since the earliest days of my culinary career: recipe development. When I was tapped on the shoulder by the Food and Culinary Professionals practice group of the Academy of Nutrition and Dietetics (formerly the American Dietetics Association) I paused for a moment. I’ve never really talked about the recipe development process before. Just done it hundreds, if not thousands, of times in the past couple of decades.
But it is a topic about which I have a lot of perspective and some strong opinions, so I figured if they just drop a nickel in me I’d be off and running. I relished the chance to discuss a subject that’s near and dear to me. This venture of trying to capture my recipe writing process in a way to easily share with others has understandably had me a bit introspective about both the nuts-and-bolts of recipe construction, as well as my own professional evolution in that realm.
An interesting and coincidental counterpoint to this consideration is the fact that I recently came across my first cookbook collaboration, circa 1974, Sherwood Elementary in Edmonds, Washington. A Mother’s Day project the class did, we each contributed a recipe and provided custom cover art for our mothers. It’s a fascinating snapshot of the era and our age group: 7-Up Salad (lime jello, marshmallows, cream cheese, crushed pineapple), Lemon Fluff (vanilla wafers, lemon jello, evaporated milk), Tang-inspired Russian Tea.
My own cute hand-written contribution here below definitely offers some what-not-to-do examples with regard to recipe writing…but I will cut my 9-year-old self some slack. I’ve got a vague memory of these treats but it’d been ages since I’ve tried them, so whipped up a batch again last weekend. With the quickest of glances at the pan, my sister immediately recognized the bars, so clearly I did justice to the family-favorite recipes from so many years ago. I’ve tried to trace this recipe to some original source, but most modern pathways just lead me to a chocolate-covered version that’s definitely not echoing this version. Only one or two references echo this simplicity, the cookie-like base with its egg white and nut topping.
Not only was it fun to revisit this old-school treat, it also provides me with an interesting opportunity to pick apart a recipe and critique its elements, highlighting some key recipe-writing approaches I’ve come to employ over the years. A real-world example that echoes content I’d shared on that webinar earlier this month.
So, here’s the “before”
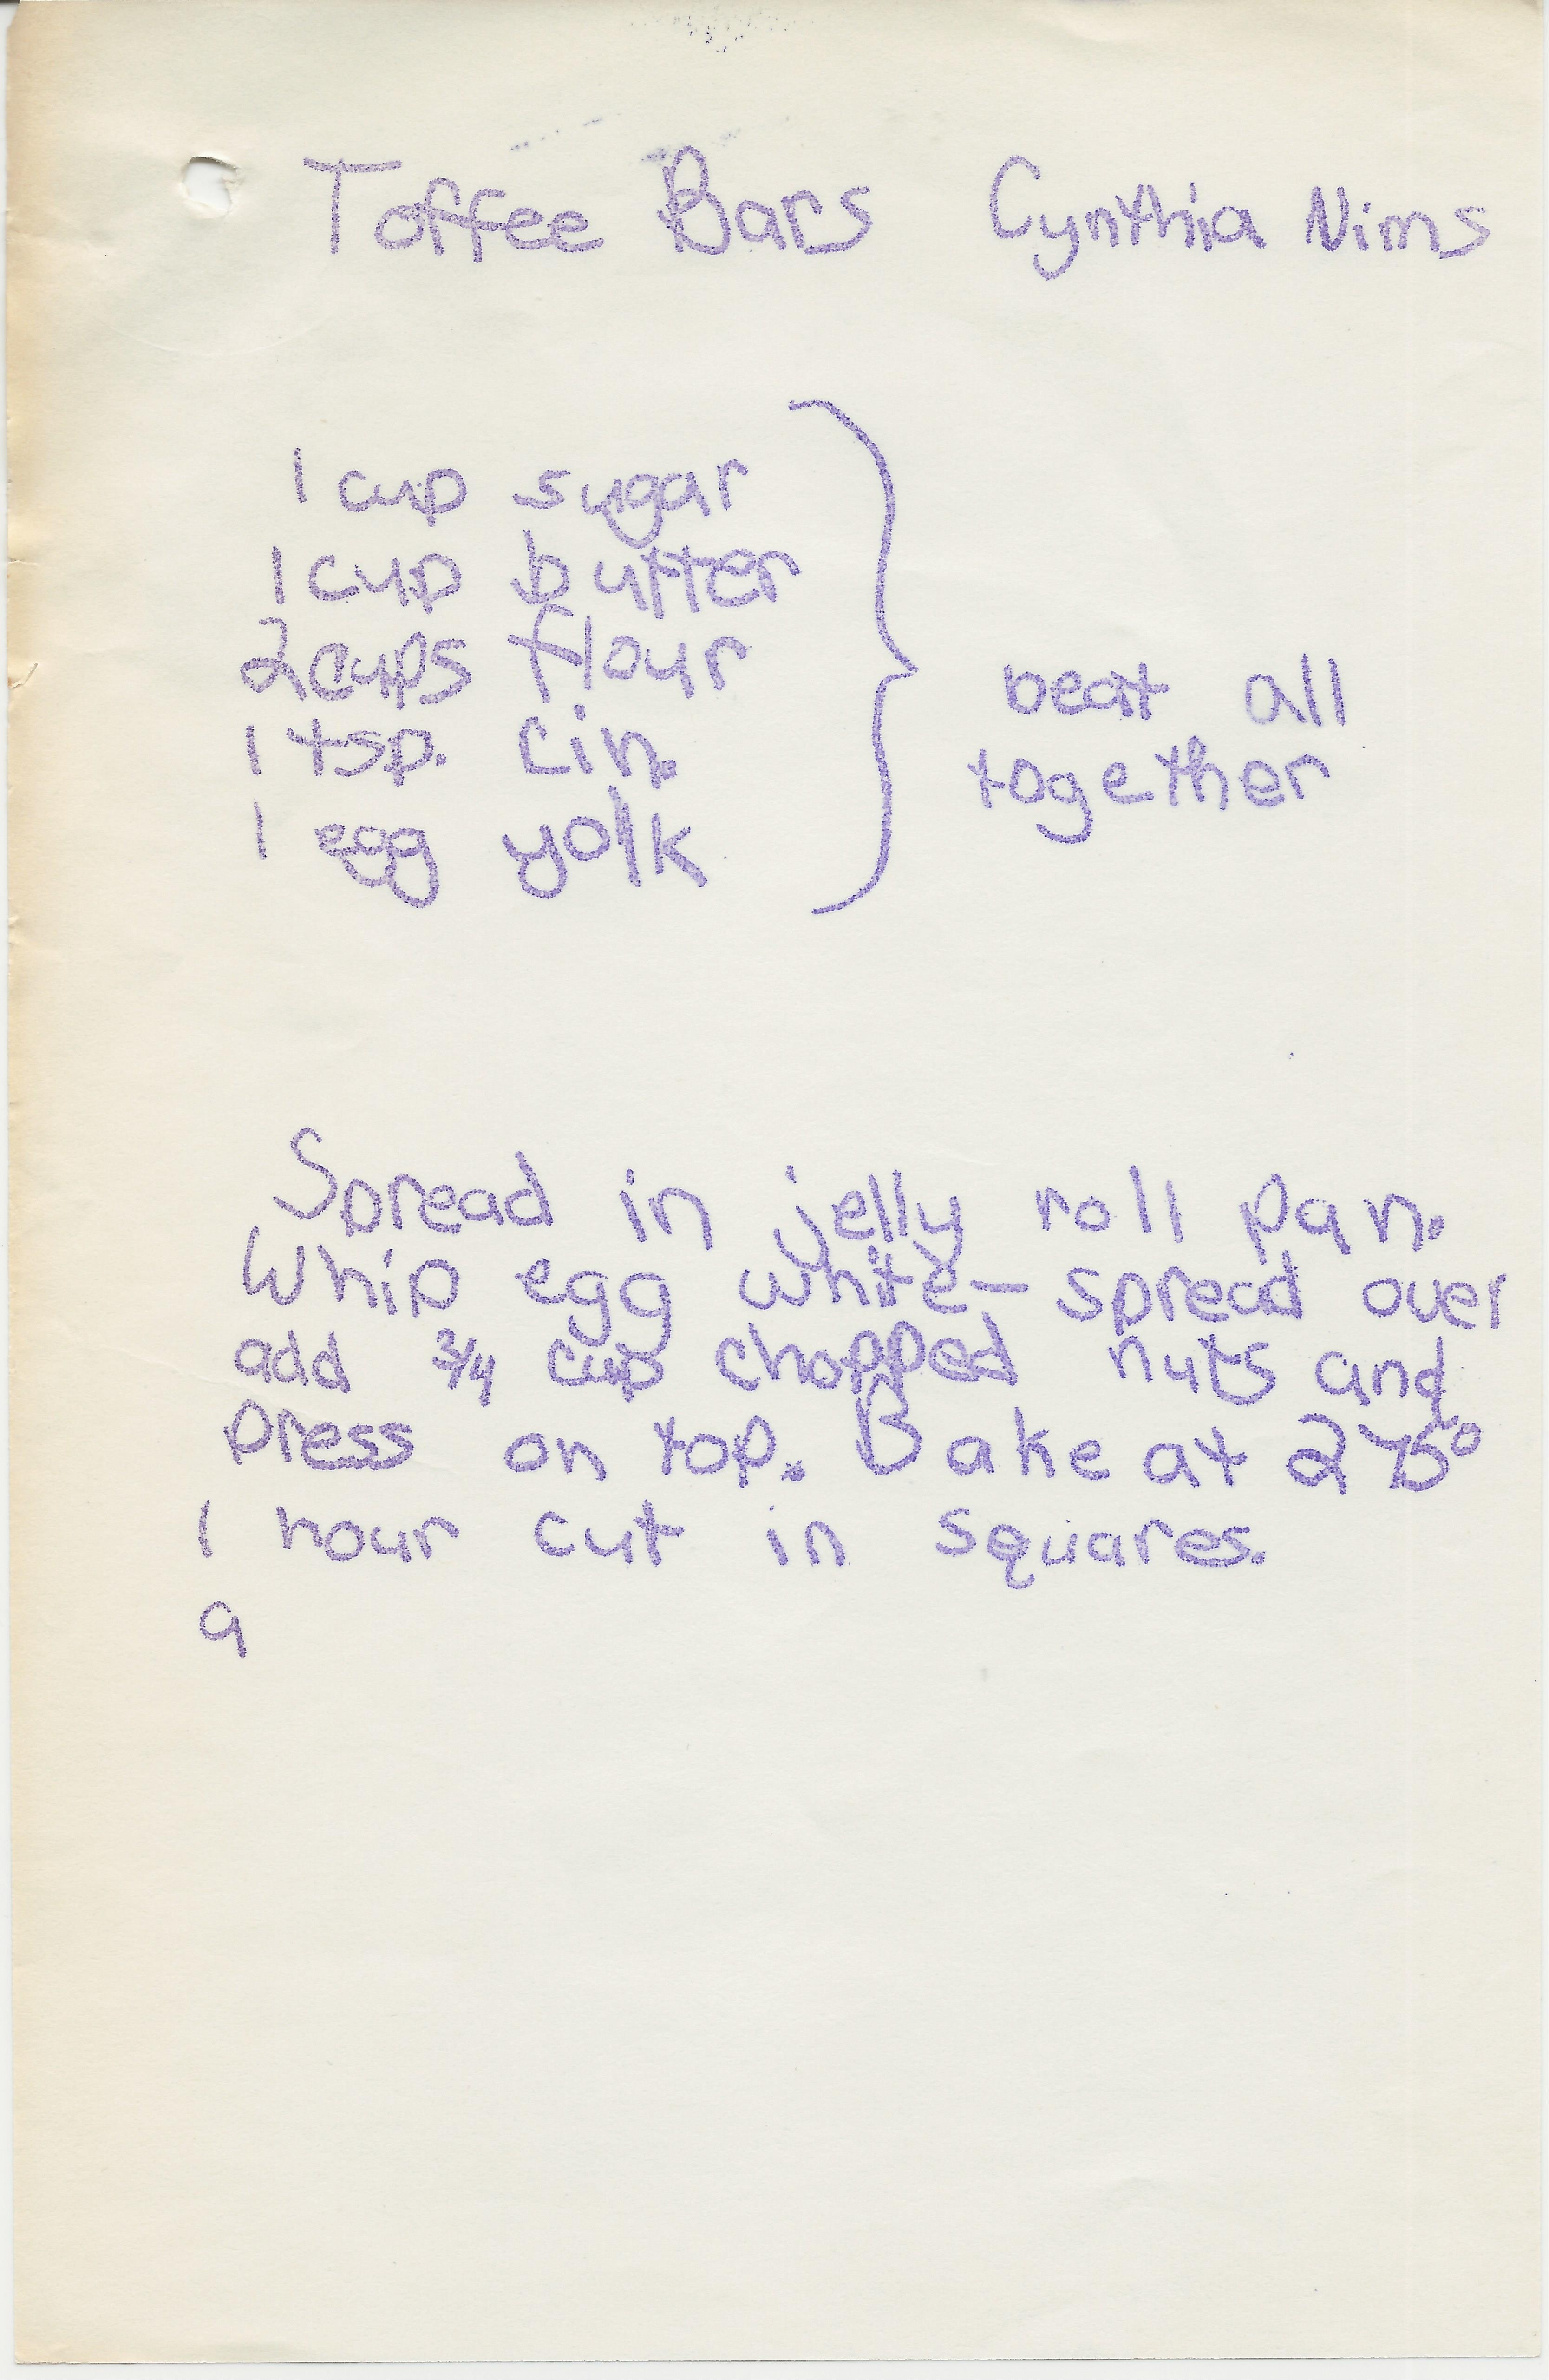
While technically it gives you enough information to recreate some semblance of the intended bars, the details are sketchy. It leaves plenty of room for improvement in terms of a thorough description of ingredients and method that is most likely to ensure desired results.
1. There’s no headnote, recipe-speak for the brief intro paragraph before diving into the ingredient list. It serves as a way to offer practical information (plan ahead for marination, alternatives for hard-to-find ingredients, tips for easy variations or accompanying dishes) or simply serve a story-telling function (inspiration for the recipe, where it came from, how you’ve adapted it over the years). In this case, the recipe’s too far back in my history and my mom is no longer around to help trace its roots. So I’d need to go with some general topic to hopefully add some interest to the recipe.
2. The ingredient list isn’t complete, a couple extra ingredients (egg white and nuts) sneak up on you in the method text. All that needs to be included with the main ingredient list. It also doesn’t offer heads-up about the butter needing to be at room temperature before blending with the other ingredients.
3. “beat all together” as a margin comment doesn’t suffice. It merits further description, results far much better if approached in stages. Cream butter and sugar first, add egg yolk, then work in the flour.
4. While the preparation is quite straight forward and doesn’t require a whole lot more detail, it does pay to be more specific about the pan (“jelly roll” doesn’t mean much to most cooks today), preheat the oven in advance so it’s hot when ready to bake, provide some sort of sensory cue for when “done.” Noting to set aside to cool before cutting, storage tips, other elements I may take for granted when making these but it benefits the reader to share them.
5. No yield is offered, something every recipe should have in some form or another (i.e. number of servings [how many people it will serve], or number of pieces [as with bars or cookies, how many per person is less a consideration]).
So, after that bit of critique, here’s the “after” I come up with: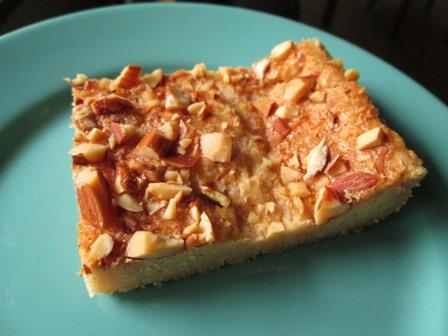
Toffee Bars
This recipe is a long-time family favorite that resurfaced recently, one I hadn’t made for many years. It sure brings back memories, though unfortunately among those memories is not one of the recipe’s source. The “toffee” reference isn’t too clear beyond the butter-sugar element but it matters not, these are tasty regardless of the name.
1 cup unsalted butter, at room temperature
1 cup sugar
1 teaspoon ground cinnamon
1 large egg, separated
2 cups all-purpose flour
3/4 cup chopped toasted nuts (walnuts, hazelnuts or almonds)
Preheat the oven to 300°F. Lightly butter a 9- by 13-inch baking dish.
Cream together the butter, sugar and cinnamon with an electric mixer until well blended and lightened in texture. Add the egg yolk and blend to incorporate. Add the flour in 3 or 4 batches, blending at low speed after each addition.
Spread the toffee bar base into the prepare baking dish, pressing down gently with a spatula or your fingers to form an even, neat layer. Use a whisk to whip the egg white in a medium bowl until quite frothy, then spread the egg white evenly over the base. Scatter the nuts over, pressing gently so they adhere to the surface.
Bake the toffee bars until moderately browned and firm, 45 to 50 minutes. Set aside on a wire rack to cool, then cut into squares to serve. Store any leftover bars in an airtight container; they’ll keep for 3 to 4 days.
Makes 18 bars

I love the mimeographed copy from your original recipe! And these sound like they’d be a nice treat. Thanks for sharing.
This brings back memories for me of the many cookie and dessert recipes I copied out as a child. And Russian Tea! Such a thing of its time. Thanks!